Monday 27 April 2009

Meal in a Box

Here's yet another post on our weekday lunch express...meal in a box.


I got the idea of making these Tuna Sandwich Rolls from a Chinese cookbook. These rolls are perfect to bring along to a picnic as they are nicely wrapped in clear plastic sheets (I cut out sheets from my cookie bags.)


I served the sandwich rolls with a simple salad...a combination of Japanese cucumbers, celery, Fuji apples, raisins and some cherry tomatoes. A cup of homemade strawberries smoothies (simply blend some strawberries with yogurt) completes the meal. I borrowed a blender from a close one recently, and we had been making smoothies every other day!


Besides tuna (I used black pepper flavour), I added some thinly sliced cucumbers to give the rolls the extra crunch. These sandwich rolls are really easy to prepare, all you need to do is:
  1. trim off the crust of a slice of bread, flattened it with a rolling pin (I simply flattened it with my fingers),
  2. spread the bread with some butter or mayonnaise,
  3. place some tuna and cucumber slices (optional) horizontally across the centre of the bread,
  4. roll up and wrap it with plastic sheets, twist and seal the ends
It was a joy to watch my kids enjoying their food. I love this delicious lunch-in-a-box too :)

Monday 20 April 2009

手做的幸福

在一个偶然的机会下, 我在一间不常去的图书馆, 从书架上找到德永久美子的這本书, '愛上做面包'。隨手拿起來翻了一翻,立刻如获至宝似的把它捧回家。沿途我一边翻阅一边幻想着,如果能学会制作那一款款的面包, 那将是多美好的事。单是想像滿室的面包香就觉得好幸福! 这真是一本好温馨的书。我也好羨慕作者有一个可爱的女兒当任她的小帮手。如果我家那两个臭小子有她一半任真的态度哪该多好!


把书借回家后, 第一个做的就是圆面包!


这都是手做的哦, 花了半小时才把面团搓好, 手都快断了! 所用的材料只有面粉, 糖, 盐, 酵母和水, 够简单吧! 可能有人又会认为这未免太单调了吧?! 可是我的理念还是: 简单就是美。越简单的材料越能突出面包本身的风味...相对的越难把它做好...因为没有其他材料(如,巧克力, 奶油, 牛奶, 鸡蛋)可以掩饰风味不足的面包。


面团发酵得很好, 虽然当天的天气不是很好, 可是, 不到一小时, 面团就膨胀了两倍。


看到小面团在烤箱里膨胀得那么圆圆滚滚可爱的模样, 不禁拿起相机, 按下快门!


我虽然没有作者不到一成的功力, 不过我还是相当满意自己亲手做的小面包 :)


你看, 它们一个个圆圆的型状是不是超可爱?!


面包的外皮酥脆, 里面松软却很有嚼劲, 就像一般欧式的面包, 有如那种用来配浓汤的面包。在热乎乎的面包涂上香浓的奶油, 简单的味道就是一种幸福...

这是第一次用中文书写, 有一点丢人现眼的感觉, 文笔不好请多多包涵 ;)

以所有爱上做面包的同好中人共勉之!

(For those of you who can't read Chinese, you may want to hop over here to read the not-so-accurate English translated version, I had a good laugh reading the translated version!! and I really didn't mean that my boys are smelly ;p )


White Bread Rolls

Ingredients
(makes about 12 mini-rolls)

300g bread flour
1 teaspoon instant yeast
1 tablespoon caster sugar
1 teaspoon salt
200ml lukewarm water (about 30 degC)


Method:
  1. Stir bread flour, caster sugar, salt, and instant yeast in a mixing bowl.
  2. Add in water. Mix the ingredients with hand and slowly form into a dough.
  3. Transfer dough to a lightly floured work surface. Knead until the dough no longer sticks to your hand, becomes smooth and elastic. This should take about 20 to 30 mins. Do the window pane test: pinch a small piece of the dough, pull and stretch it. It should be elastic, and can be pulled away into a thin membrane without tearing/breaking apart.
  4. Place dough in a lightly greased (vegetable oil) mixing bowl, cover with cling wrap and let proof in room temperature (around 28 to 30 degC) for about one hour, or until double in bulk.
  5. Remove the dough from the bowl and give a few light kneading to press out the gas in the dough. Divide into 12 portion, about 35-40g each. Roll into rounds. Cover with a damp cloth or cling wrap and let the doughs rest for 10mins.
  6. Flatten each dough into a small disc and roll into rounds again. Place doughs on baking trays lined with parchment paper. Space out the dough to allow room for the dough to expand. Dust the surface of the dough with some flour. Cover with damp cloth or cling wrap and leave doughs to proof for the second time for about 40 ~ 50mins, or until double in size.
  7. Bake in pre-heated oven at 200 deg C for 12-13 mins or until golden brown. Remove from oven and let cool completely before storing in an airtight container. Note: This bread doesn't keep well, best eaten fresh within one day.
Recipe source: 爱上做面包, 德永久美子

Monday 13 April 2009

Easy Mango Pudding

I have been buying lots of Thailand Honey Mangoes lately. It is probably the season now for these fruits. Although they are not as fragrant compared to the other varieties of mangoes, they are very sweet and juicy when ripened, and they are also relatively cheaper and affordable.


Whenever there is an abundance of mangoes in my house, I will definitely use them to make some mango puddings.


I always follow this simple recipe which is no difference from making some easy jelly. I just need to mix a pack of jelly crystals with a cup of boiling water and a can of Carnation milk, then add in the fresh mangoes, and pour into jelly cups. I usually get this "Tortally" brand of jelly crystal which is easily available from most local supermarkets and even the nearby convenient shops. However, it doesn't come with a mango flavor, so I have made do with the pineapple flavour instead. Nevertheless, it doesn't affect the taste of the mango pudding at all. This is one of our family's favourite dessert of all time.


Easy Mango Pudding

Ingredients:

1 packet (90g) of jelly crystals (pineapple flavour)
1 cup (250ml) of boiling water
1 can of Carnation Evaporated Milk (I used low fat version)
1 mango, cut into small cubes


Method:
  1. Pour a cup of hot boiling water into a bowl, stir in the jelly crystals making sure the crystals dissolved completely. (If the crystals doesn't dissolve completely, heat the mixture in a saucepan, stir till the crystals dissolve completely.) Set aside and let it cool off a little.
  2. Add in the can of evaporate milk. Stir in the mango cubes. Mix well. Spoon into jelly cups. Chill in fridge to set.

    Tip: There is no mango flavoured jelly crystals, so the closest is the pineapple flavour. After filling the jelly cups, use a teaspoon to remove air bubbles which will form on the surface, otherwise there will be unsightly bubbles on the surface of the pudding when set.

Tuesday 7 April 2009

Banana & Passion Fruit Jam

I made homemade jam again, this time, it is Banana & Passion Fruit jam.


I bought these passion fruits many weeks ago...this variety is golden-yellow with small white speckles on the skin, before the fruits were riped. I left them at room temperature, and they took weeks before they started to look 'old'...developing wrinkles and dimples on the skin. Over the weeks, the colour gradually changed to a darker shade of red. I was told that they have to turn into a deep purple (just like a mangosteen) before they are considered fully ripened.

I tasted one unripe fruit the very next day I bought them...the amount of pulp and juice in the fruit was miserable. The fruit was quite 'empty', I was only able to scoop out 2 tiny teaspoons of pulp, and it tasted very sour. I waited for almost 3 weeks...it was a torture having to check on them everyday!...and even though the skin had yet to turn purple, I cut out one fruit to try. There were more pulps and juice this time, and it didn't tasted that sour, although it is still a little tangy. The pulp smells wonderful...that's probably why this highly aromatic fruit is also known as "百香果" in Chinese (I'll like to translate it as '100-fragrance-fruit').


I didn't wait any longer and used two fruits to make this Banana & Passion Fruit jam. Other than the little extra effort required to sterilise the jam bottles, this jam is super easy to make. There are just 3 ingredients...bananas, passion fruit and sugar. The original recipe calls for slicing the bananas into 1mm thick slices...but I did it my way...simply mashed up the bananas with a fork. I mashed the bananas really well...almost like a puree, I want the finished jam to be very smooth with no chunks of bananas in it. Cooking the jam took less than 5 mins...about 2 mins to bring the mixture to a rolling boil and another 2~ 3 mins of boiling until the jam turned clear, and it was done. Once again, this recipe doesn't call for pectin, as the bananas would act as a natural pectin to set the jam. When it is still hot, the consistency of the jam will be quite runny or pourable...but it will set nicely when it cools off.


Although this jam has got more banana than passion fruit...the presence of the passion fruit is quite dominant. It is a very delicious jam and the seeds give a very nice crunch to it. This jam doesn't taste that sweet...I believe it is largely due to the slightly tangy passion fruit. It is yummy on a slice of plain toast...and I may use this jam to make a batch of muffins, or a chiffon cake soon.


Banana & Passion Fruit Jam

Ingredients:
(yields about 300ml of jam)

250g riped bananas (without skin), finely mashed
50g passion fruit pulp (pulps from about 2 fruits)
230g granulated sugar*


Method:
  1. Place finely mashed bananas, passion fruit pulp and sugar in a pot or a large saucepan. Mix well.
  2. On medium heat, stirring constantly with a heat-proof spatula or a wooden spoon, bring the mixture to a full rolling boil (where the bubbles do not stop or lessen when you stir it). Once the mixture starts to boil, skim away any excessive foams or bubbles, stirring constantly all the time.
  3. Keep at a rolling boil for another 2 ~ 3 mins, stirring constantly till the mixture thickens, becomes clearer and transparent (no more foams).
  4. Remove from heat. The jam will be a little runny when hot but the consistency will be just right after it has cool off.
  5. Ladle hot jam into hot sterilised jars leaving a gap of about 1~2cm from the top. (Since I do not have an appropriate ladle or funnel, I poured the jam into my measuring cup before filling the jars. The sprout on the cup helps easy and clean filling.) Secure lids. Let cool. Unopened jam will keep up to 3 months if stored in fridge or in a cool, dark cupboard. Once opened, store in fridge and best consumed within a week**.

    Recipe source: adapted from 鲜美果酱轻松做! by Romi Igarashi
Note:
*Do not reduce the sugar, as the amount is required to preserve the jam.
**According to the original recipe book, once opened, store the jam in fridge and best consumed withint 1 week. I didn't have any problem with my homemade jam after 3~4 weeks. However, for safe eating practices, do examine the jam frequently for signs of spoilage.


Friday 3 April 2009

Omu rice

I am a terrible cook and a complete culinary idiot. Ever since I started my life as a "煮妇" (literately translated as 'cook-wife' derived from the word house-wife) three years ago, fried rice is one of those few handful of dishes that I have constantly whipped up for my family. As my cooking skills improves, I ventured into more and more challenging dishes...and over the past one year, I find myself getting quite good at making omu rice ;)


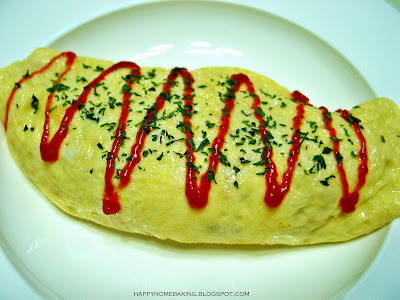
Omuraisu or Omurice or Omu Rice is a Japanese dish with stir-fried rice wrapped inside an egg omelet. The rice is usually stir-fried with chicken and vegetables and flavored with tomato sauce or ketchup. It looks like a simple dish to prepare but it gets really tricky when trying to wrap the rice with the omelet.

I remember learning how to make my first omu rice by relying on recipes I found from the internet. Most recipes come with instructions that go along these lines: cook egg omelet in a pan; add fried rice and wrap; then place a plate over the frying pan and flip the Omu rice over to the plate. This is really easier said than done! Especially when I choose to use only 1 egg instead of 2 to make the omelet. It is possible to wrap the rice fillings with my 1-egg omelet, but only with a small amount of rice. So, instead of the signature crescent-moon shape, I ended up with a flat, longish omelet (see my first attempt). Too much rice, the omelet will probably break into pieces.


It was only after I got hold of a cookbook from the library that I learned another method of wrapping the omelet. It proves to be much easier, and I could finally come up with a fatter omu rice, and still using 1 egg! The trick is to flip only one side of the omelet over the rice...then pick up the pan and slide the half-wrapped omelet onto a serving plate...and carefully tilt and turn the pan over and you will have a nice omelet on your plate. The critical success factor of this method is to be "胆大心细" (careful and yet daring)! I know, I know, with my lousy description, I am sure you wouldn't understand what was I talking about. So, I plough through the web and managed to find this video clip. This is the one of the better video clips on how to make an omu rice...it is very professional done and the recipe is almost similar to the one I have adapted from the cookbook. However, I am really amused with what I saw towards the end of the vidoe, the chef actually used a paper towel to 'shape' the omu rice!


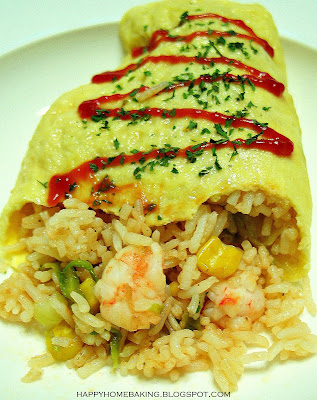
I have included the recipe below, but it is really up to individual preference when it comes to preparing the fried rice. Sometimes instead of chicken meat, I will use prawns and I always have to leave out the green peas, otherwise my kids will pick up each and single pea and pass them over to my plate! Having said that, it is still best to flavour the fried rice with tomato sauce or ketchup(use less if you don't like the sour taste) so as not to affect the authenticity of the dish.

I usually serve omu rice as a meal on its own, it is perfect whenever we feel like having a tv-dinner. Recently, my boys requested that I made Japanese curry rice for them, and instead of serving the curry with just plain rice, I paired it with omu rice. It turn out to be a great combo meal and it has since been included as a permanent item in our tv-dinner menu. Next time, I think I will serve it with hanbagu ;)


Omu Rice

Ingredients (Serves 2)

2 servings of cooked plain rice
1 chicken thigh meat, cut into bite size
1/2 yellow onion, finely chopped
2 tablespoons green peas
2~ 3 tablespoons tomato sauce or ketchup
salt & pepper
cooking oil
4 eggs

Method:
  1. Heat some oil in a wok or frying pan, sauté chopped onion until transparent. Add the chicken and sauté till chicken is cooked. Add green peas, stir through. Add in ketchup, salt and pepper to taste and continue to stir fry. Add in cooked rice and toss rapidly. Dish up and set aside.
  2. Lightly whisk 2 eggs in a bowl (I used only 1 egg). Heat up a frying pan with some oil. Pour in the egg mixture and tilt the pan to coat the base. Cook until eggs are almost set but still a little runny in the middle.
  3. Lower the heat and spoon half of the fried rice mixture in the middle of the omelet. With a spatula, flip one side of the egg over the rice mixture. Pick up the pan and with the unfolded side, slide the omelet from the frying pan to a serving plate, just half way through. Then, carefully tilt and turn the pan over and the omelet is on the plate. For this step, watch this video clip.
  4. Repeat the same for the remaining portion of the rice. Drizzle with ketchup and serve immediately.
    Recipe source: 轻松学做菜: 烹饪秘诀195