Friday 25 April 2008

PlayDough

I have always thought that I will have to make two separate doughs in order to produce a dual coloured marble bread. Which also means that I will have to use the bread machine to knead one dough, while I work on the other manually. It will be impossible to get the bread machine to knead both doughs as there will be at least a half hour lapse between the two doughs, no?


Thanks to this Chinese cookbook on bread making that I found the way to get around with the problem. All I have to do is to knead the dough just like any other bread recipe. After the bread machine completed the kneading cycle, I divided the dough into 3 equal portions. Don't be lazy, use a scale to weigh the dough so that you get three equal portions. For one of the doughs, I kneaded in half a teaspoon of green tea powder...the 2nd portion I added in one teaspoon of cocoa powder (it was supposed to be half teaspoon, but I used the wrong measuring spoon!!). The 3rd portion I left it plain. It was not too difficult to knead in the powdered green tea/cocoa...just a few gentle kneading should get the powder fully integrated into the dough. I didn't follow the recipe on the flavourings as it uses green tea, curry powder, and a red ingredient which I am not sure what it is.


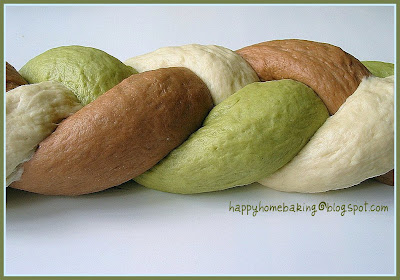
The three dough were then left to rise in separate bowls. After they doubled in size, I shaped them into rounds and left them to 'rest & relax' for about 10mins before they were shaped into long ropes. The doughs were quite easy to handle...except for the plain dough which was still a bit sticky after the first proofing. The three long ropes were then plaited.


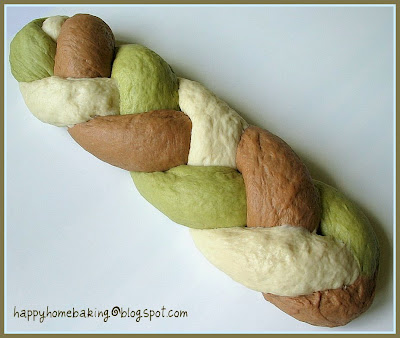
After the braided dough was left in the tin to proof...I noticed something wasn't right. The plain dough started to tear away as the dough expanded. Since I couldn't do anything at this stage, I sent it to the oven to bake after the second proofing.


This was how the bread looked like when it was unmold! I though it should be added straight to my list of kitchen disasters ;,(

It was so disappointing!


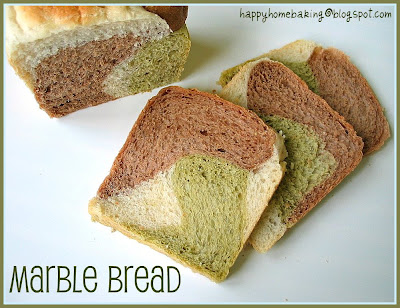
I only felt sightly better after I sliced the bread...at least the swirls and marbling effects were quite interesting.


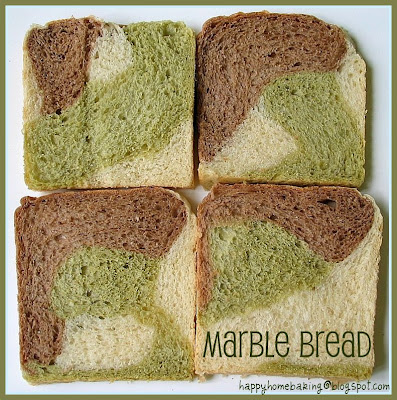
and each slice of bread has got it's own unique pattern! The texture of the bread was excellent...soft and light. Even though I could taste the cocoa powder in it, the bread tasted really plain on it's own. The taste was not very different from any of those plain store-bought sandwich bread. The flavour from the green tea powder was so subtle that you won't know its existence if not for the colour.

So, have you been wanting to try out a colourful bread all this while? If the answer is positive, why wait?!


Marble Bread

Ingredient:

300g bread flour
30g caster sugar
1/4 teaspoon salt
1 & 1/4 teaspoons (5g) instant yeast
180g water

20g unsalted butter

1/2 teaspoon green tea powder
1/2 teaspoon cocoa powder

Method:
  1. Place water, sugar, salt, bread flour in the pan of the bread machine (according to the sequence as stated in the instruction manual of your bread machine). Make an indentation on the flour and add in the instant yeast.
  2. Select the Dough function of the bread machine and press start.
  3. After about 8mins of kneading, add in the 20g of butter. Let the machine continue to knead the dough. After the kneading cycle has stopped (20mins), Stop and Restart the machine. Continue to let the machine knead for another 10mins.
  4. Remove dough from the bread pan. Divide dough into 3 portions (about 170-180g per portion).
  5. On a lightly floured surface, take one dough and knead in the cocoa powder. Repeat the same with the second dough with the green tea powder. Place the doughs in 3 separate bowls, cover with cling wrap and let them rise till double in volume, about 60mins.
  6. Remove doughs and give a few light kneading for each dough. Press out the trapped air as your knead. Shape into balls and cover with cling wrap, let the dough rest for 10mins.
  7. For each dough, flatten and roll out into a oval shape about the size of 30cm by 15cm. Roll up, lengthwise, swiss roll style to form a long rope.
  8. Plait the three long doughs. (It is not necessary to plait very tightly). Pinch and seal the ends tightly. Place the plaited dough into a pullman tin* (well greased). Tuck the ends down. Cover the lid and let dough proof for 60mins or until the dough rise up to 90% of the height of the tin.
  9. Bake at preheated oven at 180-190 degC for about 30mins.
  10. Remove from oven and unmold immediately.
Recipe adapted from 孟老师的100道面包
*size of my pullman tin, about 7.5" x 4" x 4"

Wednesday 23 April 2008

Fond Memories

Warning: This post has got nothing to do with food. Skip this if u are looking for something edible :)


Guess what is this? No, this is definitely not edible...


and it is not some exotic fruits either...


yes, it's a pine cone!! It's the huge, long one at the background of this photo, which is actually more than 30cm in length!


I didn't do any baking today...and took the time to do some 'area' cleaning instead. I gave these three pine cones a good 'shower' and left them to dry under the morning sun. This is the first time I have given them a proper shower...not sure whether I will do any damage to them??

Since I wasn't doing much(I seems to have plenty of time if I am not baking!)...I decided to take some photos of these cones and played around with the editing tool which I recently discovered in the flickr site. I love how the photos turned out after adding in the border and the text. It certainly brings some 'life' to an otherwise boring photo. It helps to cover up the not too good lighting conditions too! You will probably notice that the right side of all my photos tend to be brighter than the left...as I could only rely on the natural lights coming from the windows on my right :'(


I remember collecting these pine cones with my elder boy, many years ago...he was only 2 years old then. That was a xmas eve morning in the year 2000.


After doing up the images, I can't help but to blog about these cones as they have brought back such fond memories. Those were the happiest moments of our lives...we were able to make long road trips on every weekend during our short stay in the States...to visit the national parks and be really close to nature.


I think I like this image best...I hope you have enjoyed reading this post :)

Saturday 19 April 2008

If You Give An Oreo Cookie Monster...

an oreo cookie sandwich, he will probably ask for another two more...then he will probably ask for some ice cream to go with the oreos...and perhaps some chocolates too....


It was only a few days ago that I discovered the joy of taking images of a slice of ice cream cake. As the camera clicks away, the icy frosting on the outer layer started to disappear...and very soon, the ice cream began to give in to our hot and humid weather...as if urging me to dig in right away...telling me I should just dump that camera aside. and I did just that. I helped myself to one huge mouthful before I continued to give it another couple of clicks before I wiped up the entire slice...


that happened to be a slice from this birthday cake I made for my husband. Two weeks before his birthday, I asked him what kind of cake would he like this year. As usual, he asked for something that has got oreos in it. So the two of us sat in front of the computer and I typed in the key words "oreo cake" and clicked on the 'Search Everyone's Photos' on Flickr. I was pleasantly surprised to see the photo of a cake I made appeared on the screen. He took a hard look and it was apparent that he couldn't remember that was his birthday cake last year. Anyway, inspired by the beautiful images which started to appear on the screen one by one, he requested for an ice cream cake..and we left things as it is. I didn't think there would be anything more difficult than to head down to the store to get a pack of oreos and a tub of ice cream for his birthday ;)


Well, since he has walked with me for more than half of his lifetime, and to thank him for always being there by my side, I thought I really should put in some effort to grant his wish. After reading up on how to make an ice cream cake, I made up this Oreo Ice Cream Cake...which was choked to the brim with layers of oreo cookies.

The base was a layer of oreo crumbs, which I covered with a tub of Cookies & Cream ice cream. I even added some oreo chunks into the ice cream layer. Next came the chocolate ganache layer...and it was generously dusted with oreo crumbs before topping off with more oreo cookies! The only thing that had got nothing to do with oreos was the chocolate birthday 'card'. It was among one of the many goodies given to me generously by VB. Thank you VB!


It was a very good experience coming up with this cake since this is the first time I have ever made an ice cream cake. It was actually much simpler than I thought. I used a loose bottom pan for the cake...and since I do not have any appropriate plastic sheets to line the sides of the pan...I improvised by using long strips cut from a cookie bag. You need lots of patience when making this cake. It has to be well chilled before unmolding. I tried to unmold it when it was only in the freezer for 2hrs...as I thought the surface looked well set...but the ice cream started dripping from the sides when I tried to release the pan. I quickly returned it to the freezer and tried it again 4hrs later...and it came off nicely!

The only downside of this cake: the oreo cookies that were used to decorate the top loose their crisp after they were in the freezer for so many hours. I read that one way to overcome this problem is to decorate the cake just 30mins before serving. Warm a palette knife by running it under hot water, dry it and swipe it over the chocolate layer a few times. Once the chocolate is soft enough...'stick' whatever cookies or fruits on top, and send it back to the freezer to set before serving. I'll try this method on my next ice cream cake :)


Oreo Ice Cream Cake
(makes one 18cm cake)

Ingredients
110g oreo cookies (finely crumbled)
40g butter, melted and cool
about 1 tub of ice cream (1.5 ltr)
1 cup Nestle pouring cream (or heavy cream)
150g dark chocolate, finely chopped

Method:
  1. Line the sides of a loose bottom pan with plastic sheets. Set aside.
  2. Place oreo crumbs and melted butter in a bowl. Mix thoroughly with a spoon until the crumbs are moistened. Press the crumbs evenly into the base of the prepared pan. Use the back of the spoon, smooth out the crumbs and press firmly. Freeze the base for at least 1 hour.
  3. Soften the ice cream at room temperature. When the ice cream is soft enough, place it in a mixing bowl. With a spoon or spatula, stir the ice cream until it is spreadable. Spoon the ice cream over the oreo base, ensure all gaps are filled. Depending on the depth of the pan, fill it with enough ice cream till it reaches about half to one inche before the rim. Cover with a cling wrap and freeze for at least 2 hours.
  4. When the ice cream layer is set, prepare the chocolate ganache. Place cream and finely chopped dark chocolates in a bowl over a pot of simmering water. Stir till the chocolate melts complete. Leave to cool off.
  5. This step has to be done as quickly as possible. Spread the chocolate ganache over the ice cream layer. Decorate as desired.
  6. Cover with cling wrap and freeze for at least another 6 hours before unmolding. When ready to unmold, dampen a kitchen towel with hot water and wrap it around the pan and hold it there for about 10seconds. Remove the towel and unmold. After unmolding the cake, return it back into the freezer to firm up before serving.

Wednesday 16 April 2008

Cooking with Rosemary

Before I stepped into the world of blogging, I have never cooked anything with herbs. I don't even use local Asian ones, not even Chinese parsley's or spring onions commonly available in the wet markets here. I am totally clueless when it comes to herbs and spices. It was only recently that I started adding some dried mixed herbs to ready-made pasta sauce, and have since ventured into cooking with fresh herbs.


I have chosen to use rosemary as my first fresh herb in cooking and baking...just so that I can make a Rosemary & Garlic Focaccia bread ;) When I first placed a sprig of fresh rosemary under my nose, I didn't really like the smell of it at all! It was only when the loaf of bread was baking in the oven, the distinct aroma from the rosemary filled my entired kitchen...this herb has since won my heart.


I made another loaf of rosemary focaccia last week. Once again, I was attracted to a recipe by the beautiful photo of the bread baked in a rustic looking skillet. Since I don't have a proper skillet to bake this bread, and even if I have one, it won't fit into my small oven, I halved the recipe and used a 20cm round pan to do the job...hoping I could duplicate the effect effortlessly ;)


Although this Italian bread was baked beautifully to a golden hue, taste wise I much prefer the first one I tried...maybe that one has got garlic in it, making it a winner compared to this one. Nevertheless, the crusty bread tasted really good on it's own when served warm and freshly baked. It should go really well alongside a bowl of clear soup or salad. If they were left over night, toast them a little just before serving to crisp it up. By the way, this recipe calls for proofing the dough not just twice, by three times, making it a light an airy bread.


The first dish I cooked with rosemary was roast chicken. I experimented with chicken thighs as my family would not be able to finish a whole chicken. This time I made roasted chicken wings instead. The wings were rubbed all over with some salt, pepper, chopped rosemary, some dried mixed herbs and lemon rind, and left to marinate over night. Half an hour before I was ready to roast the wings, I took them out from the fridge and rub with some cold butter all over, before baking at 200degC for about 45mins~1hr. I must say I prefer roasted chicken thighs than wings, as they are more meaty and juicy...although both types of chicken parts roasted in this manner yield nice, crispy & yummy skin.


With the leftover rosemary sprigs, I made this very simple and yet very very delicious oven-roasted Rosemary Potatoes. These were baked by adapting a recipe by Jamie Oliver. If you love potatoes, I strongly recommend that you give this a try...I am certain you will be rewarded with a tray of potatoes that are slightly crispy on the outside and yet fluffy on the inside.


Rosemary & Olive Oil Focaccia
(make one small loaf)

Ingredients

250g bread flour
3.5g instant yeast
1/2 tablespoon chopped fresh rosemary, plus extra for sprinkling
1/2 tablespoon sea salt, plus extra for sprinkling
137.5 ml water
1 tablespoon extra virgin olive oil, plus extra for drizzling

Method:

  1. Combine flour, yeast rosemary and salt in a mixing bowl. Make a well in the centre and add the water and oil. Mix with hand to form a soft dough.
  2. Transfer dough to a lightly floured surface and knead for 8 ~ 10 mins until the dough is smooth and elastic.
  3. Shape in to a ball and place in an oiled mixing bowl, cover with cling wrap and leave to rise for 1 hour or until double in bulk.
  4. Knock back the dough on a lightly floured surface and roll out to form a round. Press the dough into a 20cm (8") round pan. Cover with cling wrap and leave to rise for 1 hour.
  5. Using your fingers, press indentations over the dough. Cover with cling wrap and leave to rise for a final 30mins until well risen.
  6. Sprinkle dough with a little sea salt, drizzle with a little oil and scatter over some rosemary.
  7. Bake in a preheated over at 200degC for about 25mins until risen and golden.
  8. Cool on a wire rack and serve warm.

Recipe source: adapted from Fresh Baked by Louise Pickford

Thursday 10 April 2008

Story of A Chocolate Torte

I had not just one but two chances to re-visit this classic chocolate torte recipe over two weekends.


This was a birthday cake I made for a close one. My younger boy was as eager to offer his help on both occasions. He even volunteered to fold in the egg whites...which I have to turn him down. It was better to have him sulk over it than to take the risk. After 'dolling-up' the cake a little, I asked my better half for his opinion...as I was quite happy with it, I was expecting to hear some nice comments. He took a look and commented matter-of-factly, "The cake cracked leh."


Yes, I had to agree happily that the cake was all craggy, to make things 'worst', it came with a well sunken centre too! and this is how it should be! As this sort of cake uses only a little amount of flour, even though it will rise in the oven, without flour to hold its structure, it will start to crack and collapse. Don't be fooled by the crusty exterior...I promise you, the inside is very smooth and moist. Hop over here to learn more about this kind of cakes.


I am sure you can spot those two tiny holes there...it was evident that I had checked the cake twice...once at 30mins and another, about 2 mins later, before I took out the cake. The cake should be done when a skewer inserted into the centre still comes out with a little moist crumb clinging onto it. You really wouldn't want to over bake it.

You see, my not-so-reliable oven, has got hot spots which can be rather annoying. The cake was over browned at one particular spot...as I didn't want to open the oven door to turn it around, halfway into baking...for fear that the cake would not crack!I believe the timing, and oven temperature is quite critical when baking this cake.


Compared to my previous attempts, I must say this latest version has cracked most beautifully.


The other cake I baked a week earlier was a far cry from this...Shiyan, if you are reading this, my apologies for not doing a good job. The cake didn't rise as high too. I suspect the main reason was the way the egg whites were whipped.

For the earlier cake, I had beaten the whites with just a pinch of salt...and nothing else. This is actually the recommended method stated in the recipe. It took a longer time to beat the whites to stiff peak...and the texture was not that silky and smooth...it looked more like foams...very porous...and I was quite sure I didn't over beat it. Whereas for this birthday cake version, I revert to the same way as I'd made the cake for the very first time. I took half the amount of sugar and added it a little at a time while beating the whites. It only took about 5mins or so to reach stiff form. The mixture was smooth and glossy, something which I am familiar with.


I didn't want to add any other cream or frosting to this cake, as I believe it tastes really good on it's own. I have used a dark chocolate with a 64% cocoa content...a Carrefour house brand. Even though it is cheap (compared to other brands), I thought it is considered quite a good quality chocolate.


So, for this plain looking cake, I dress it up with a good dusting of icing sugar and wrapped a ribbon around it.


I was very satisfied with how it looked...

...hmmm...until...


I found this ribbon in my cupboard!

Not unlike a girl who decided to change her outfit when she was just about to step out of her house...I just had to change the ribbon! and so, another round of dressing up and photo taking! I'll have to practice a lot more on how to tie a pretty knot though...the one that I did really cannot make it...so I had it well hidden in the photo ;')


Note: I have updated the recipe a little...hop over if you are interested to give this a try.

Saturday 5 April 2008

Mixed Berries Yoghurt Bread

After reading about KWF's Yoghurt Bread, I couldn't wait to try it. In fact, I have earlier planned to make a yogurt bread base on a recipe from a cookbook. However, I decided to try her recipe first as her lovely buns are just too good to give it a miss!


Instead of shaping the bread into buns, I made it into a loaf...for the sole reason that my younger boy has recently developed this love of spreading half kaya and half butter on a slice of bread. He has since demanded for a square bread every morning, for the past 2 months...and he would rather have just milk with honey stars if there is no square bread on the breakfast table.

A couple of weeks ago, I chanced upon a range of Gold Harvest flour on promotion at the local supermarket. The discounted price was almost the same as the usual bread flour I used. I grabbed one pack of the Harvest King Better for Bread Flour without any further hesitation, even though I had to lug the 5lb (2.2kg) flour, on top of the other stuff I bought, all the way home...on public transport. It was only after making a few other loaves before I got the chance to use this brand of flour for this loaf.

I used my breadmaker to knead the dough for a total of 30mins. Just after the first 15mins of kneading, I could hear the dough banging loudly in the bread pan. This meant that the dough was already smooth and no longer stick to the pan. I stopped the machine after the 20mins of kneading cycle had completed...re-start and let it knead for a further 10mins. Even though the dough didn't exactly passed the pane or stretch test, I removed it from the pan, shaped it into a smooth dough and let it rise in room temperature. Within an hour or so, the dough had doubled in size. I divided it into 3 equal portion, shaped and rolled into 3 smaller doughs and let them proof for the second time in a pullman tin. The second proofing took a little longer...it was way pass 1.5hrs before the dough rise up close to the rim. I baked the bread at 180degC for 30-35mins.


I have used Meiji's mixed berries yoghurt for this bread. As the yoghurt was purplish(it has got strawberries, raspberries and blueberries in it)...the dough became an odd colour during the mixing. I added in a tiny drop of pink food colouring, just to make sure that the bread would not turned into some strange colour. The result was a pretty pink bread :)


The bread was a great success. Look at how soft and cottony the texture was?! Besides the yoghurt, I wonder whether the Harvest King flour had a major role in contributing to the nice texture of the bread??


Although the fragrance from the yoghurt was quite prominent in the bread, taste wise, it was a little plain on it's own, probably due to the small amount of sugar used. It didn't has the 'chew' (嚼劲) as compared to the Hokkaido Milk Loaf (which I baked just two days before this loaf, so I was able to remember its texture). Nevertheless, it went well with my raspberry jam. The bread stayed soft for two days...and as suggested by my friend VB, I kept one slice up to the third day...it was just a little on the dry side. This recipe is certainly a keeper...I will make this whenever I can find a tub of yoghurt in my fridge :D

I managed to borrow this book from the library over the weekend. I really liked the cute toast photo on the cover, and couldn't help but made a copycat version ;p


Here's sharing with you what is mentioned in this book...regarding how to choose a good loaf of sandwich bread. Basically there are 4 factors to look out for:

1. The finished loaf should have a nice even square shape, and the crust should be nice golden brown. The holes on the crumbs should be evenly distributed...and they should not be too big or too small, this implies that the bread has undergone a proper proofing process.

2. The bread should emit just a mere hint of fragrance from the wheat, it should not give a yeasty odor or sour flavour (unless it you are making a sourdough bread).

3. The inside (crumb) should be soft, tender and would spring back when lightly pressed.

4. A tasty sandwich bread should have a light chew to it. It should taste soft and yet a little moist, and not dry. When chewed, it should not form into a lump, giving a doughy texture and taste. In addition, the bread can be shredded/torn into long stripes easily...evidence of a well kneaded dough.

So, did your homemade bread pass all these criteria? Mine certainly has got lots of room for improvement :)